
Lacuna
1970 Aquarius 23
#231
Lacuna's specifications
Lacuna is an Aquarius 23, hull #231, manufactured in 1970 by Coastal Recreation, Inc., of California. Dennis Todd and Ed Moye have owned her since 1990. She's carried them around Vancouver Island; throughout Puget Sound, the San Juan Islands, and the Gulf Islands; down the Columbia River from Richland, Washington, to Astoria, Oregon; and on many aimless miles on her home waters, Fern Ridge Reservoir, near Eugene, Oregon. Her 2015 adventure was the Inside Passage from Olympia to Glacier Bay and back.
The A-23 was designed by Peter Barrett, a champion small-boat racer, to be a family-friendly sailboat that could be easily operated and transported. It features a capacious interior, light weight, simple rigging, removeable inboard rudder, lead ballast encapsulated in a shallow keel, and a retractable centerboard. While retaining the best of these features, we have made many modifications to improve her performance, comfort, and safety.

(click here for a larger image)
A-23 brochure (.pdf, 6.3 MB)
Dimensions
length overall 22' 8"
waterline length 21' 2"
beam 7' 11"
draft 13"/4' 7" (centerboard and rudder up/down)
interior cabin height 4' 11"
displacement 2,280 pounds
displacement/length ratio 105
sail area/displacement ratio 23
ballast 815 pounds (includes 165-pound centerboard)
working sail area 248 sq. ft. (143 sq. ft. main, 105 sq. ft. jib); spinnaker 276 sq. ft.
Features
Cockpit, rudder: The rudder shaft is mounted in a removeable box that is fitted into a trunk in the aft cockpit sole. This placement has both advantages and disadvantages when compared with a stern-mounted rudder. Advantages include the ability to mount the outboard motor directly on the stern on centerline, keeping the weight more centered and forward than in other small sailboats with stern-hung rudders, where the outboard is mounted on a bracket off the centerline. Lacuna's rudder is balanced, allowing a light touch on the helm, contrasting with the often heavy feel of an unbalanced, stern-hung rudder. The short distance between the centerboard and rudder enables her to maintain control even when perched atop a steep wave and to turn sharply when needed.
Disadvantages to this design include the inability of the rudder to kick up when striking sunken objects, the necessity of wrestling the rudder, box, and tiller assembly out of the boat before loading Lacuna on her trailer, and until recently, a persistent leak when motoring near hull speed (the joint between the top of the trunk and the cockpit sole is a known trouble spot in this design). The plastic fuel tank has since been replaced by an aluminum fuel tank under the cockpit sole.
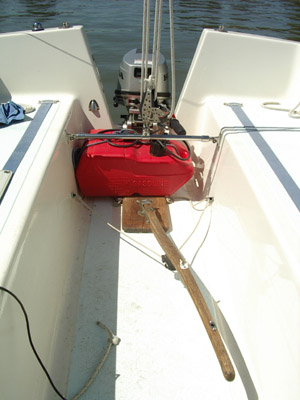
The rudder and tiller had quite a bit of play. The hinge between the tiller and the cap atop the rudder shaft had excessive play because the holes in the cap ears were worn large. I had a machinist bore out the holes in the ears of the shaft cap and fabricate a bushing that spanned between the ears. A bolt with and aircraft nut holds everything together. For extra security, I drilled a hole (not shown in this photo) through the cap and shaft and put in a machine screw with aircraft nut as a pin to hold the cap on the rudder. Before, it was only the friction of the clamp on the cap and a setscrew on the shaft key that kept the rudder from falling out of the boat.

Whatever bearing surfaces there might have been in the rudder box were long gone. I removed the wooden top, excavated all the foam, and fabricated bearing plates of high density plastic to fit the top and bottom of the box. I used forstner bits and a drill press to drill the holes for the rudder shaft at just the right angle. I secured the bottom plate inside the rudder box with heavy tapping screws. After fitting a piece of 1.5" ABS pipe to fit tightly between the top and bottom bearing plates, I filled the box with expanding foam insulation. After it hardened, I cut off the excess, re-installed the top, and put the rudder assembly together.


The Aquarius 23 has a deep stern cutout for the motor, which allows the cockpit to drain quickly if the stern is pooped by a wave (which has never happened to me). The rudder box has two vertical slots that act as cockpit drains, making the cockpit self-bailing. They also allow water to flow into the cockpit when the stern squats into the water, as it does when motoring fast or when sailing hard with half a dozen people on board. This water found its way through a few small, persistent leaks between the top of the trunk and the deck and ran down inside the hull to pool on the cabin sole. In 2006, I finally corrected this by excavating all the original fiberglass filler and balsa wood around the top of the trunk, letting it dry thoroughly, then filling the cavity with West System epoxy and high-strength adhesive filler.
The bridgedeck is higher than the stern cutout, reducing the likelihood that the cockpit could flood the cabin. Three mahogany wash boards fit into teak channels around the companionway.

Hatch: We converted the large pop-top hatch to a slider by installing stainless steel angle flanges along the lower outboard edges of the hatch. The flanges slide in grooves milled in 1.5" X 1.5" clear oak rails installed the length of the cabintop aft of the mast.
Standing rigging: The A-23 is tender, allowing her rig to be light. The fractionally-rigged mast has no spreaders, which makes raising and lowering the mast easier, but lacks the self-reefing feature of spreader-induced mast bend when gusts hit. It's equipped with a Strong Track mast track and slides, which greatly reduces friction when raising or lowering the mainsail.
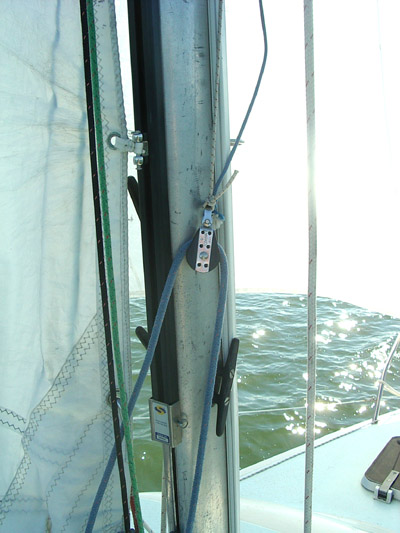
In 2020, we added a Boomkicker and got rid of our topping lift and backstay. The backstay was an option for sailors who wanted to fly a spinnaker. We have raised ours no more than three or four times in 30 years--it takes too much paying attention and we don't need the speed. The absence of the backstay made the aft third of the cockpit much more usable.

The A-23 originally was set up for using the boom for roller reefing. In the gooseneck, a pin and a spring held the gooseneck fitting into the end of the boom. Pulling the boom aft allowed it to be rotated. We set Lacuna up for slab reefing and installed a vang so we never rotated the boom. But the boomkicker forced the boom back and twisted it. I replaced the spring in the gooseneck with a 3/8" brass pipe nipple cut to length so it would hold the squared-off gooseneck fitting in the square pocket of the boom end. The boom cannot rotate.

Raising the mast: We contrived a mast-raising system that allows us to raise or lower the mast using a genoa sheet winch, jib halyard, spinnaker pole, and system of lines to stabilize the mast as it goes up. A single person can raise or lower the mast in less than an hour.

The spinnaker pole serves as a gin pole to raise the mast. The mast and the pole are stabilized by lines led to padeyes at the outboard edges of the cabin top directly athwart the mast base. The lines are tied with camel hitches so the tension can be adjusted during the process. When the mast is horizontal, the top of the gin pole is set a bit aft so it will clear the forestay chain plate when the mast is fully erect. The spinnaker halyard is attached to the end of the pole and cleated off on the mast. Another line runs from the end of the pole through a snatch block attached to the forestay chain plate. I place the snatch block so there is enough clearance on the chain plate to attach the forestay when the mast is up. This lifting line runs to the genoa sheet winch on the side of the cockpit. One person can crank it up with the winch and control its position easily by cleating off the lifting line. Ed and I used this technique many times even in wind and waves so we could get under highway and railroad bridges and into creek mouths for safe anchorages on the Columbia River.

The mast stabilizing lines are about six feet up the mast. The pole stabilizers run from the end of the pole to the same padeyes on the cabin top.

This photo shows the padeye locations and the mast stabilizing lines with camel hitches.

The snatch block on the bow.

The base of the mast with the pole attached to a heavy duty padeye.
Unlike some A-23s, Lacuna has lower shrouds and had a backstay (split above the transom and anchored to stern chainplates). The shroud chainplates are bolted to the inside of the hull. Sealing the shroud chainplates where they pass through the deck has been a persistent problem--every sealant we've tried has eventually failed. I finally found the solution in butyl rubber "tape," which has become my sealant of choice in virtually all applications.
Running rigging: All running rigging can be operated from the cockpit. The mainsail has three sets of reef points. The first and second reef can be taken in from the safety of the cockpit; the third, which we've never used, would require a crew on the cabin top. A downhaul line on the headsail makes it possible to douse sail completely from the cockpit. As the wind rises, we go to the foredeck and hank on a smaller headsail to balance the reefed main. In heavy weather, we rig jacklines on both sides and clip into them or a strong padeye in the cockpit.
Mainsheet: The original mainsheet rigging was minimalist, consisting of a sheave on one stern quarter, a double block at the end of the boom, and a sheave and cam cleat on the other quarter. I won't go into its many faults, but after several iterations we came up with a mainsheet system that is easy to use from any place in the cockpit with either rail to weather. It's an efficient system with a centerline pull on the end of the boom.

![]()

The crossbar is 7/8" stainless steel tubing with fittings made for dodgers. At its ends, pushpins hold it to anchors, permitting quick removal when the rudder must be pulled. The Harken ratcheting block has become one of our most prized pieces of equipment. It allows easy mainsheet control no matter how big the wind gets.
Like many small yachts of the vintage, Lacuna was originally reefed by rolling the boom. This system precluded the installation of a vang. After we set up slab reefing, we installed a block-and-tackle vang with 4:1 purchase, giving us better control of sail shape.
Hatches, ports, and deadlights: Lacuna has two opening hatches, one on the foredeck and the other in the aft cabin bulkhead. A small hatch in the port side panel of the cockpit footwell allows access to the pressure water outlet. A solar vent is installed over the head compartment during extended periods of idleness but removed from the path of the sliding hatch before sailing.
Her original deadlights were plexiglass in aluminum frames. No matter how we tried, we couldn't get them to stop leaking. When we repainted Lacuna in 1998, we replaced the aluminum-framed deadlights with surface-mouned smoked acrylic deadlights sealed with silicone. That was a mistake. They leaked. We installed rain gutters, which prevented water from reaching the upper edge of the deadlights. In 2014, we replaced the deadlights, which were damaged while the boat was in storage in the yard. A February ice storm broke the top out of a nearby oak. When it fell, it toppled onto the cabin top, fracturing the deadlights and breaking the fiberglass around the openings. The stoutness of the construction is impressive. The repairs were easy. We removed the rain gutters. This time we used butyl rubber "tape" to seal the deadlights. Butyl rubber doesn't harden, which may or may not be an advantage. They haven't leaked since.

We laminated mahogany frames for the inside and finished them with high-gloss varnish. They are certainly more attractive than the corroded aluminum frames they replaced!

Boom tent: In 2005, Eric Olsen helped me make a two-part boom tent of Odyssey III 6.5- oz. reinforced with Shelter-Rite 18-oz. coated polyester.The tent, supported by three heavy-duty aluminum collapsing tent poles, ties to stanchions and other fixed points. The front half alone provides enough shelter to leave the main hatch open in most conditions. I spent many happy hours in its shelter watching the rain while swinging at anchor. The zip-off aft half provides complete shelter for the cockpit and privacy at the dock. It was one of my most valued accessories on the Inside Passage, providing a rare opportunity to stand upright on Lacuna without getting rained on.

paint: In a two-month ordeal in which we sometimes resembled space-suit clad miners working on Mars or Venus, Ed and I painted Lacuna (1998). After renting a capacious shop, we stripped her of everything removeable above the waterline: fittings, hardware, ports, hatches, mast step, stanchions, rubrail, and pulpit. After de-waxing the surfaces and scraping off the loose flakes of gelcoat, we sanded and ground fractures, crazing, and poxed gelcoat down to a solid surface. We filled larger voids with West System epoxy and #404 high density filler then faired the surface with epoxy and #410 microlight filler.
We inspected all through-deck holes for core rot. We used an L-shaped nail driven by a cordless drill as a router to grind out any soft fibers. We filled the cavity with epoxy and #404 and re-drilled the hole before installing the hardware.
We took everything out of the interior and wire-brushed and sanded the flaking paint a previous owner had applied (before then, a crawl back under the cockpit would inevitably lead one to be festooned with peeled paint flakes). After the interior and exterior were prepared, we hired professional painters to apply the paint. One sprayed the hull and topsides with two-part Awlgrip white epoxy primer (D8001) and Awlgrip Egg Shell White (H8015). Another painter applied Awlgrip Ice Blue (H5004) on the nonskid and trim and brushed the interior with Pettit Easypoxy gloss white one-part polyurethane. Given the toxicity of the solvents and the cost of the Awlgrip, we felt they earned their pay.
While re-installing the hardware and fittings, we replaced the backing plates under the stanchions (leaks had turned the plywood backing plates pulpy), winches, and other high-load applications with plates made of high density polyethylene. Relying primarily on Boat Life Life-Calk,we re-bedded all the deck fittings.

Radar/chartplotter: JRC Radar1800 color radar/chartplotter with 12" radome mounted on Seaview mast platform. (2005) This unit can hold two C-Map cartridges. I put it on a swing-arm mount so it can be seen from the cockpit or the cabin. Although I didn't put many hours on this unit because of its high electrical consumption, it was well worth its keep when I needed it. It allowed safe passage when fog obscured all detail. I would have used the chartplotter more if it weren't integrated with the energy-sucking radar. Even in standby mode, the radar's draw was substantial. The screen is easily scratched. The operating procedures were sometimes frustrating, especially in route planning.
Battery charger: Xantrex Truecharge 10A three-stage, two-bank charger (2000). This unit provides almost worry-free battery maintenance. When the batteries are deeply discharged, it will charge them at a high rate, then will reduce the voltage as they approach full charge. When they are fully charged, it applies a low charge to keep them topped up. It isolates the two deep-cycle 12V batteries and charges each as needed.

![]()

Solar panels: Lacuna has three flexible solar panels (Uni-Solar, one 10W and two 5W) and a Sun Selector M-8 charge regulator (2000) that, like the Xantrex, has three charging stages, from deep charge to maintenance, for two isolated batteries. We usually place the panels on the sliding hatch and hold them in place with light bungee cord, but the panels can be placed almost anywhere on the boat for optimum solar exposure.
Depth sounder: Humminbird HDR600 (2000). This unit has been reliable, although the display sometimes fogs when the cabin humidity is high and the outdoor temperature is low. It can read more than 400' depth in seawater. The sender is glued to the inside of the hull below the vee-berth. In 2007, we added a Raymarine Bidata ST40 depth sounder/knotmeter.
Tillerpilot: Raymarine ST1000+ (2005). This unit replaced an erratic Autohelm ST2000 that I purchased at a sailors' swap meet. Caveat emptor! While the new ST1000 doesn't have the deplorable tendency to execute unexpected hard turns to port that characterized the used ST2000, it's not entirely satisfactory. It quickly became waterlogged when put into service in Alaska rains, and was operable only after being taken apart and dried in front of an electric space heater for more than 24 hours. After that, I wrapped it in a Visqueen -and-black-tape rain jacket to keep it dry. Not a good advertisement for Raymarine products!
Tiller controls: Lacuna has a Tiller Tamer, a low-tech way to keep the tiller in a fixed position, and a telescoping tiller extension to allow easy control from anywhere in the cockpit.
Engine controls: Added in 2007, the two-lever control in the cockpit allows the skipper to adjust the engine throttle and shifter while looking ahead instead of astern at the motor. The bracket that holds the cable housing ends at the motor was too wide to allow the Honda 8hp outboard to be steered through its range--it bumped against the sides of the stern cutout. I bent the shifter side of the bracket up and inward until it cleared the side of the cutout. The resulting angle of the cable to the shift lever precluded the use of the adapters included with the control kit. I fabricated an adapter that allowed an off-angle pull on the shift lever. The control makes docking in tight quarters much easier.
Knotmeter: Raymarine Bidata ST40 (2007). This device measures water speed, water temperature, water depth, trip distance, and possibly other information that I have yet to discover. The instruction manual is skimpy.

Wind instrument: Raymarine ST40 Wind System (2007). This device has a masthead anemometer but no vane. One of the three anemometer cups has a small tab sticking out.The electronics sense the difference in rotation speed as that cup makes the circle and translate that into wind direction data. Unfortunately, the installation instructions are inadequate and some trial-and-error fiddling is required to point the masthead sensor in the right direction. The wind direction indicator can be dialed in from the panel if the sensor is pointed in approximately the right direction.
Pressure water: We installed a Plastimo 13.2-gallon flexible water tank under vee-berth, a Scandvik recessed shower hose in cockpit, a pressure pump, and pressure accumulator in 2005. A deck fill and 1.5-inch hose supply the water tank. We use the shower hose to wash dishes in the cockpit.
Anchors: Fortress Danforth-style (2000), Lewmar Claw (2005), 40' chain, 250' nylon rode, bow roller (2005), rode bag. The Claw performed wonderfully in all conditions during the Alaska voyage.
Outboard: Honda BF8A (2004). Plenty of power, very dependable and economical.
Fuel tank: A 26-gallon aluminum tank is secured under the cockpit just behind the battery compartment, supplied by a deck fill on the coaming. A Racor fuel filter/water separator is included in the supply line to the motor (2005).
Dinghy: 17' Sevylor Ocean Kayak, self-bailing inflatable with rudder (2005).
Shore power: Marinco 120V-30A stainless steel power inlet, 25' 30A shore power cord w. adapters for 15A and 20A outlets, 30A breaker, one GFI-protected outlet in the cabin, switched feed to battery charger.
12V electrical system: Two deep-cycle batteries isolated by a Guest 3100 battery selector switch.
Safety gear: Flares, VHF, jack lines, strong points, radar reflector
Sails: The mainsail is a full-batten dacron cruising sail made by Waagmeister, Portland, Oregon (1993), with three sets of reef points. It was converted to Strong Track sliders by North Sails Portland (2006).
Headsails include a storm jib (Waagmeister, 1993), a heavy-weather jib (Mack Sails, 2000), a working jib (Mack Sails, 2000), a 145% genoa (North Sails, 2006), and the original spinnaker.
At anchor, we use the main halyard to raise a riding sail. Made of the head of a dinghy jib, it is backwards when compared with other sails, with the tack tied aft to the stern quarter and the clew tied forward to the base of the mast. It acts like the feathers on an arrow, keeping the boat from yawing excessively when the wind is up. Without it, Lacuna will sail on her anchor, turning broadside to the waves when she reaches the end of the rode and tacks back, making for a very uncomfortable anchorage.

Sail cover: In 2011, I bought a kit from Sail-Rite and sewed a stack-pack sail cover of blue Sunbrella fabric. The sail cover stays permanently in place, held up by jackstays attached higher on the mast. The top zipper is unzipped before the sail is raised. When the sail is dropped, it is held by the jackstays and drops into the bag. No more wrestling with a sail that refuses to flake!

Slab reefing system: a great safety feature. With lines run aft from the mast, we can put in the first and second reefs without leaving the cockpit. The Boomkicker holds the boom up while the halyard is eased and a reef line taken in. Each reef line takes in both tack and clew. When the sail is tight to the boom, the reefing line is cleated, the halyard is tightened, and the topping lift eased. With the lazy jacks and sail cover, the excess sail is flaked safely away. The whole procedure can be done in under two minutes. For a tender boat like the A-23, easy reefing can make sailing safer and more comfortable. I always try to remember the old sailor's caution that if you think it might be time to reef, you should have done it a few minutes ago.
Sanitation: Lacuna has a Sealand SaniPottie with built-in holding tank, plumbed through a three-way diverter valve to a deck fill for pump-out and to a macerator for overboard discharge (2001). This is just a plastic portable toilet that separates into two parts. The upper part, which forms the seat, is also a water tank. With a squeeze pump, it is supposed to flush the toilet. We didn't find it satisfactory so we use a 2-liter flexible water bottle with a squirt nozzle to flush. The lower part is a holding tank that can be removed and taken to a porta-pot dump. We plumbed it with a dip tube leading to the diverter valve.
Bilge pump: We installed an automatic bilge pump at the lowest point under the galley counter (2005). It has never been needed but it's reassuring to know that it's there.
Lights: Lacuna has the standard set of navigation lights, with side marker lights, a masthead anchor light, steaming light, and stern light. The steaming light also includes a deck light. Inside, all lights are LEDs or fluorescent.
Radios: Fixed VHF with a Digital Antenna model 222-VW at the mast head, and continuous coax without a deck break. Handheld VHF. AM-FM cassette (1999).
Compass: Plastimo MiniContest (1998)
Chart locker: Lacuna has over a hundred pounds of charts, guides, atlases, and books. Click here to go to her library page.
Cushions: Sunbrella Cello Cocoa interior, Phifertex Plus Sand cockpit cushions. Non-slip underlining fabric. reticulated foam (2007).

Bottom paint: Petit Vivid blue (2016).
Standing rigging: replaced 2007.
Trailer: Custom-fitted King, galvanized frame, dual axle, surge brakes, LED lights, rollers under the keel, carpeted bunks under the hull (2008). The trailer cost more than an A-23 is worth, but the peace of mind on the highway is priceless.
